
Monitoring of a Proxmox cluster with checkmk
This article explains how to monitor a Proxmox Ceph HCI cluster (3 nodes) and how to make the configuration. For the configuration of the Ceph-checks, please see the following article: Monitoring of a Proxmox VE Ceph Hosts with checkmk.
Attention: These instructions only function if you have a valid SSL-certificate and if the Proxmox nodes are soluble via DNS. For all other setups, there is the point "Monitoring without DNS and SSL".
Requirements
To monitor a Proxmox VE cluster, the following components are needed with checkmk:
- an installed Linux server (Debian 12 preferred)
- a complete installation of the docker
- an operation-ready, functional checkMD-RAW container (free of charge)
- Proxmox nodes must be soluble via DNS
- Proxmox nodes need a valid SSL-certificate
Proxmox configuration
So that checkmk can call up the data from Proxmox VE, a group and an associated user must be created and justified on Datacenter-level.
-
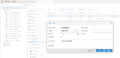
 Create read-only group
 -
Set group rights
-
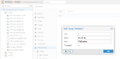
 Create and assign user


checkmk agent installation
This step must be performed for every host. So that the agent can registrate in checkmk, you first have to create the host in checkmk. Log in to the Web-UI in checkmk under Setup -> Agents -> Linux. You need the packaged-agent:check-mk-agent_2.2.0p8-1_all.deb. On the Proxmox host, you can install it as follows:
root@PMX4:~# wget http://10.2.1.180:8006/cmk/check_mk/agents/check-mk-agent_2.2.0p8-1_all.deb
root@PMX4:~# dpkg -i check-mk-agent_2.2.0p8-1_all.deb
Configuration in checkmk
Create Proxmox hosts
This step must be made for every host. In order for the agent to register in checkmk, we first need to create the host in checkmk. Log in to the Web-UI and you can add the Proxmox host under Setup -> Hosts -> Add Host. The following must be filled out:
- Basic settings -> Hostname: name or IP of the Proxmox host
- Monitoring agents -> Checkmk agent / API integrations: (API integrations if configured, else Checkmk agent)
- After saving with "Save & view folder", we configure the API integration using the special agent for Proxmox VE.
Deposit Proxmox user
Under setup, you can type in "Proxmox" and select "VM, Cloud, Container" with the sub-item Proxmox VE. With Add-Rule, you can create a rule. Here, it is important, that the following data is deposited:
- Username: deposit checkmk@pve
- Password: deposit relation
- Conditions -> select Explicit Conditions
- Explicit Hosts: All Proxmox nodes of the cluster created in checkmk must be selected here.
Deposit Proxmox cluster
- Setup -> Host -> Hosts > Add cluster
- Basic settings: host name: pve-cluster-01 (name of cluster) and node: add host to cluster
- Network address: IP address family: No IP
- Monitoring agents: Checkmk agent / API integrations: API integrations if configured, else Checkmk agent
- Safe
Configure clustered services
- Setup -> search for clustered -> Clusterd services
- Add Rule
- Conditions -> Explicit Hosts -> select nodes of PVE-cluster
- Services: Enter Interface fw in the first field and Interface tap in the second field.
Registrate host at checkmk
If the agent is installed on the Proxmox core, you have to registrate the host in checkmk first. This must be performed for every server. Please adapt the following parameters on the environment. Attention: We have changed the default port of the agent-receivers from 8000 to 8007.
- -- hostname <Name or IP of Proxmox Hosts>
- -- server <Name or IP + Port of checkmk-server>
root@PMX4:/etc/check_mk# cmk-agent-ctl register --trust-cert --hostname hostname --server checkmkserver:8007 --site cmk --user cmkadmin

Please enter password for 'cmkadmin'
Registration complete.
Monitoring without DNS and SSL
.png)
These instructions only function if all hosts are reachable via DNS and if the SSL-certificates are valid! If you only want to have the checks with IP and without valid SSL-certificate, you have to do the following:
- create host in checkmk
- checkmk agent on Proxmox host
- registrate hosts with cmk-agent-ctl on checkmk-server
- service discovery in checkmk
If this is done, the basic checks are available.
Source
 |
Author: Jonas Sterr Jonas Sterr has been working for Thomas-Krenn for several years. Originally employed as a trainee in technical support and then in hosting (formerly Filoo), Mr. Sterr now mainly deals with the topics of storage (SDS / Huawei / Netapp), virtualization (VMware, Proxmox, HyperV) and network (switches, firewalls) in product management at Thomas-Krenn.AG in Freyung.
|
 |
Translator: Alina Ranzinger Alina has been working at Thomas-Krenn.AG since 2024. After her training as multilingual business assistant, she got her job as assistant of the Product Management and is responsible for the translation of texts and for the organisation of the department.
|