
Instructions for easy image creation with Clonezilla
This article provides instructions for the creation of replicable system snapshots with the Clonezilla tool .
Download of Clonezilla
For the creation of your image, please download the latest Clonezilla version (approximately 480 MB)
| Hint (as of June 10th, 2026): If you would like to send us an image when setting up your custom hardware, please use Clonezilla-live-20240408-noble-amd64.iso! |
SHA256 hash:
a5fc3b870c615e4da55e3b368101aae56ac460e63bef72d9a178cf378aded0c9 clonezilla-live-20240408-noble-amd64.isoPreparation
To protect your image, you will need:
- Clonezilla on an USB-stick
- data carrier to protect your image
You will find short instructions for the creation of a bootable stick with Clonezilla in the article Cloning a Windows installation with Clonezilla
The stick is then prepared for the creation of the image. The following Linux-commands are required for the preparation:
$ sudo dd if=clonezilla-live-20240408-noble-amd64.iso of=/dev/Gerätebez.usbstick bs=1M status=progress
$ sync
Creation of image
In the following, you will find instructions covering the entire process, from booting with Clonezilla to the final image file.
There may be differences in more recent versions.
-
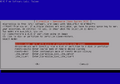
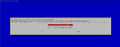
 0) After booting directly into Clonezilla: Select Default Setting at this point.
 -
 1) Language: English (default)
 -
 2) English keyboard layout (default).
 -
 3) Start Clonezilla
 -
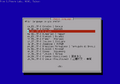
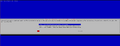
 4) Work with disks or select partitions
 -
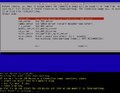 5) Select local_dev and connect the target data carrier(USB Stick.. wait for 5 seconds/ detection)
 -
 6) Select data storage device for image (in the example, a 7.3 GB USB stick)
 -
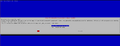
 7) Confirm image storage on USB-stick
 -
 8)Select Beginner Mode (sufficient for most use cases)
 -
 9) Select savedisk
 -
 10) Determine names for the image
 -
 11) select source data carrier, here: 120GB system M2.SSD
 -
 12) Select skip checking/repairing source file system
 -
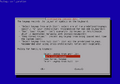
 13) After cloning, check the image again for integrity.
 -
 14) Do not use encryption (default Not to encrypt the image)
 -
 15) Define operating status after image
 -
 16) Cloning from source drive/system SSD to target drive USB stick is starting
 -
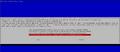
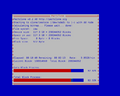 17) Cloning of system data carrier in progress
 -
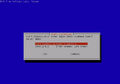
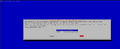
 18) Confirmation of successful verification of the created image


 |
Author: Wilfried Seifert Wilfried Seifert, working in the Systems Engineering department at Thomas-Krenn, is responsible for system/prototype development in his work area. LPIC 3 certified, deals with construction / programming of embedded / GPIO systems; in his spare time he likes to repair old home computers, attends Linux conferences or is on the road with his bike (MTB) for sporting compensation.
|
 |
Translator: Alina Ranzinger Alina has been working at Thomas-Krenn.AG since 2024. After her training as multilingual business assistant, she got her job as assistant of the Product Management and is responsible for the translation of texts and for the organisation of the department.
|