
Enable Proxmox PCIe Passthrough
The virtualization solution Proxmox VE (Proxmox Virtual Environment; shortened PVE) allows the passthrough of PCIe devices to individual virtual machines (PCIe passthrough).[1] A virtual machine can thus exclusively control a corresponding PCIe device, e.g. a network card. This has many advantages over virtualized hardware, such as reduced latency. This article shows which configuration steps are required on the Proxmox VE host and then in the VM to connect a network card to the VM.
Hardware requirements
To pass through PCIe devices, both the motherboard and the CPU IOMMU (I/O Memory Management Unit) must support interrupt remapping.
Generally, Intel systems with VT-e and AMD systems with AMD-Vi provide such support. The IOMMU function may need to be enabled in the BIOS.
Proxmox CE configuration
The following configuration steps are required to activate the PCIe Passthrough function on the Proxmox VE. To do this, start an SSH connection or the shell in the Proxmox web interface for the node pve.
Grub Configuration
To be able to pass PCIe devices to VMs, the parameter intel_iommu=on for Intel systems or the parameter amd_iommu=on for AMD systems must be set in the Grub configuration /etc/default/grub of the Proxmox VE system:
- Example for an Intel system:
GRUB_CMDLINE_LINUX_DEFAULT="quiet intel_iommu=on" - Example for an AMD system:
GRUB_CMDLINE_LINUX_DEFAULT="quiet amd_iommu=on"
Then update the grub configuration with update-grub:
update-grub
Add kernel modules
Edit the file /etc/modules as root user with write permissions:
root@pve:~# vi /etc/modules
Add the kernel modules and save the file:
# /etc/modules: kernel modules to load at boot time.
#
# This file contains the names of kernel modules that should be loaded
# at boot time, one per line. Lines beginning with "#" are ignored.
vfio
vfio_iommu_type1
vfio_pci
vfio_virqfd
Update initramfs
The last step is to update the initramfs:
root@pve:~# update-initramfs -u -k all
Perform restart
The required configurations via shell are now completed at the Proxmox VE node. Restart the system to apply the changes.
root@pve:~# reboot
Check function
After the system has been rebooted, check the dmesg output (Kernel Ring Buffer) and the loaded modules.
The dmesg output must show that the IOMMU is enabled:
root@pve:~# dmesg |grep -e DMAR -e IOMMU -e AMD-Vi
[...]
[    0.273374] DMAR: IOMMU enabled
[...]
[    1.722014] DMAR: Intel(R) Virtualization Technology for Directed I/O
Also check if the kernel modules previously added to /etc/modules are loaded correctly:
root@pve:~# lsmod | grep vfio
vfio_pci               49152  0
vfio_virqfd            16384  1 vfio_pci
irqbypass              16384  2 vfio_pci,kvm
vfio_iommu_type1       32768  0
vfio                   32768  2 vfio_iommu_type1,vfio_pci
Configuration example of an Ethernet network card
The general configuration on the Proxmox VE system required to pass any PCIe card to the VM guests has now been completed. This section shows how to pass a PCI device to a VM using an Intel I350 network card.
Proxmox PU
Start the Proxmox VE system console or connect via SSH.
Show PCI devices
The lspci command outputs all detected PCI devices, identify the correct network card. In this example a NIC of the I350 network card is used. The combination 18:00.0 means bus 18, slot 0 and .0 describes the first function of the I350, in this case the first port. The address 18:00.1 describes the second function or second port of the network card.
root@pve:~# lspci | grep Ethernet
18:00.0 Ethernet controller: Intel Corporation I350 Gigabit Network Connection (rev 01)
18:00.1 Ethernet controller: Intel Corporation I350 Gigabit Network Connection (rev 01)
19:00.0 Ethernet controller: Intel Corporation I210 Gigabit Network Connection (rev 03)
60:00.0 Ethernet controller: Intel Corporation Ethernet Connection X722 for 10GBASE-T (rev 09)
60:00.1 Ethernet controller: Intel Corporation Ethernet Connection X722 for 10GBASE-T (rev 09)
Show IOMMU Groups
The bus address is important to identify the IOMMU group of the NIC. With the following find command you can see that the address 18:00.0 is assigned to IOMMU group 23. If you want to assign multiple NICs to one VM or if you want to assign NICs of one network card to different VMs, it is important that each NIC is in a dedicated IOMMU group. This is necessary to enable PCI passthrough.
root@pve:~# find /sys/kernel/iommu_groups/ -type l | grep 18
/sys/kernel/iommu_groups/23/devices/0000:18:00.0
/sys/kernel/iommu_groups/18/devices/0000:17:0e.7
/sys/kernel/iommu_groups/18/devices/0000:17:0e.5
/sys/kernel/iommu_groups/18/devices/0000:17:0e.3
/sys/kernel/iommu_groups/18/devices/0000:17:0e.1
/sys/kernel/iommu_groups/18/devices/0000:17:0e.6
/sys/kernel/iommu_groups/18/devices/0000:17:0e.4
/sys/kernel/iommu_groups/18/devices/0000:17:0e.2
/sys/kernel/iommu_groups/18/devices/0000:17:0e.0
/sys/kernel/iommu_groups/24/devices/0000:18:00.1
Virtual Machine Configuration
In this example, the NIC assigned to IOMMU group 23 is now assigned to VM "100 (IntelDCM)". Stop the VM if it is running.
Add PCI Device to the VM
Go to the Hardware section of the VM configuration in the Proxmox web interface and follow the steps in the screenshots below.
-
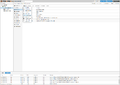 Go to the Hardware item and then select the PCI Device item in the Add drop-down menu.
 -
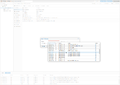 In the drop down menu Device search for the ID 0000:18:00.0 or the IOMMU Group 23 and click on this entry.
 -
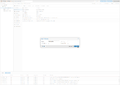 The Device is selected, note the item All Functions. In this case, do not check the checkbox, otherwise both NICs would be added to the network card. Click on Add.
 -
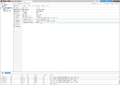 The PCI Device is now added.


Identify network card
Start the VM and connect to the VM via console.
The output of ip a now shows a new network interface ens16:
[tk@localhost ~]$ ip a
[...]
3: ens16: <NO-CARRIER,BROADCAST,MULTICAST,UP> mtu 1500 qdisc mq state DOWN group default qlen 1000
    link/ether a0:36:9f:5c:df:20 brd ff:ff:ff:ff:ff:ff
The lspci command outputs the newly connected network card:
[tk@localhost ~]$ lspci
[...]
00:10.0 Ethernet controller: Intel Corporation I350 Gigabit Network Connection (rev 01)
[...]
Detailed output of the lspci -v command for more details:
[tk@localhost ~]$ lspci -s 00:10.0 -v
00:10.0 Ethernet controller: Intel Corporation I350 Gigabit Network Connection (rev 01)
	Subsystem: Intel Corporation Ethernet Server Adapter I350-T2
	Physical Slot: 16
	Flags: bus master, fast devsel, latency 0, IRQ 11
	Memory at fea00000 (32-bit, non-prefetchable) [size=1M]
	Memory at feb50000 (32-bit, non-prefetchable) [size=16K]
	Capabilities: <access denied>
	Kernel driver in use: igb
	Kernel modules: igb
Check function
A function check shows whether the network card is working correctly. This can be checked using ethtool in conjunction with the interface name:
Output of ethtool ens16, disconnected network cable:
[tk@localhost ~]$ ethtool ens16
Settings for ens16:
	Supported ports: [ TP ]
	[...]
	Speed: Unknown!
	Duplex: Unknown! (255)
	[...]
	Link detected: no
Output after the network cable is plugged in, note the output at Speed, Duplex and Link detected:
[tk@localhost ~]$ ethtool ens16
Settings for ens16:
	Supported ports: [ TP ]
	[...]
	Speed: 1000Mb/s
	Duplex: Full
	[...]
	Link detected: yes
Configuration of the network connection
The network card is now successfully assigned to the VM and the functional test was successful. You can now configure and use the interface.
References
- ↑ PCI(e) Passthrough (pve.proxmox.com)
 |
Author: Thomas Niedermeier Thomas Niedermeier working in the product management team at Thomas-Krenn, completed his bachelor's degree in business informatics at the Deggendorf University of Applied Sciences. Since 2013 Thomas is employed at Thomas-Krenn and takes care of OPNsense firewalls, the Thomas-Krenn-Wiki and firmware security updates.
|