
Graylog - Remote Log Server Management of a Proxmox VE cluster
With the help of Graylog, protocols or logs of server systems can be created in a cluster. This article explains the installation and the configuration of a Graylog server on a Proxmox VE host or guest system.
These logs are quite important for the administration of server systems. The evaluation of logs informs about changes of the system. So, the origin of problems can be limited and a better availability of the system is therefore ensured. After the failure of a server or cluster, the bug fix can be better planned with the help of logs.
Requirements
The following resources are necessary before the use of "Graylog":
- A virtual machine (VM) or a server with Debian 11.X/12.X with IP configuration of the system inclusive route to the Internet
- The CPU-type has to be changed to
hostduring the installation of a VM, otherwise MongoDB will not be started.
Enough storage capacity also has to be planned in. The collected logs need a lot of storage space over a long period of time.
Installation and configuration
The steps for the installation and configuration of "Graylog" will be explained in the following steps.
MongoDB installation
We use MongoDB as database for the collected logs in "Graylog".
At first, the MongoDB repository is added to the source list, to install it afterwards. The following commands have to be executed to install the packages:
Hint: If you are not registered as root user, sudo has to be set in front of every command.
apt install wget && gnupg -y
wget -qO - https://www.mongodb.org/static/pgp/server-6.0.asc | apt-key add -
echo "deb http://repo.mongodb.org/apt/debian bullseye/mongodb-org/6.0 main" | tee /etc/apt/sources.list.d/mongodb-org-6.0.list

apt update
apt install mongodb-org -y

systemctl daemon-reload
systemctl enable mongod.service
systemctl restart mongod.service
systemctl --type=service --state=active | grep mongod
OpenSearch
Next, the package OpenSearch has to be downloaded and installed. "OpenSearch" is an Open Source tool for the representation and evaluation of log files.
Some precautions have to be taken in order to use OpenSearch:
Hint: As of Open Search version 2.12, an initial password has to be stated, otherwise the installation will fail.
wget https://artifacts.opensearch.org/releases/bundle/opensearch/2.12.0/opensearch-2.12.0-linux-x64.deb

env OPENSEARCH_INITIAL_ADMIN_PASSWORD=<custom-admin-password> dpkg -i opensearch-2.12.0-linux-x64.deb
This prompt is displayed after the installation of OpenSearch, although the installation was successful:
# NOT starting on installation, please execute the following statements to configure opensearch service to start automatically using systemd

systemctl daemon-reload
systemctl enable opensearch.service

# You can start opensearch service by executing
systemctl start opensearch.service

# Create opensearch demo certificates in /etc/opensearch/ See demo certs creation log in /var/log/opensearch/install_demo_configuration.log
This prompt indicates that OpenSearch has to be activated first in order for it to start automatically. This can be ignored, as it is done later in the instructions.
Graylog configuration
Next, some adjustments have to be made at OpenSearch to enable the connection to Graylog later.
For this, open with nano the following file:
nano /etc/opensearch/opensearch.yml
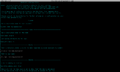
The following parameters should be adapted in this file to install a minimal setup:
cluster.name: graylog
node.name: ${HOSTNAME}
path.data: /var/lib/opensearch
path.logs: /var/log/opensearch
network.host: 0.0.0.0
action.auto_create_index: false
plugins.security.disabled: true
discovery.type: single-node
-
 initial configuration
 -
 configuration after the above-mentioned adjustments
 -
![The last three parameters can be completed at the end of the file. Afterwards, the editor mode can be left with [STRG+X] and a confirmation with [Y].](//www.thomas-krenn.com/de/wikiDE/images/thumb/6/6e/Graylog_OpenSearch.png/120px-Graylog_OpenSearch.png) The last three parameters can be completed at the end of the file. Afterwards, the editor mode can be left with [STRG+X] and a confirmation with [Y].
The last three parameters can be completed at the end of the file. Afterwards, the editor mode can be left with [STRG+X] and a confirmation with [Y].


![The last three parameters can be completed at the end of the file. Afterwards, the editor mode can be left with [STRG+X] and a confirmation with [Y].](/en/wiki/File:Graylog_OpenSearch.png)
The parameters Xms and Xmx have to be adjusted. Xmx states the maximum storage allocation pool for a Java Virtual Machine (JVM), while Xms states the initial storage allocation pool.
nano /etc/opensearch/jvm.options
-
 initial configuration
 -
 configuration after half of the installed storage capacity has been allocated to both values.


After the storage of this file, a parameter must be set for the virtual memory:
sysctl -w vm.max_map_count=262144
echo 'vm.max_map_count=262144' >> /etc/sysctl.conf
After that, the service can be activated and started:
systemctl daemon-reload
systemctl enable opensearch.service
systemctl start opensearch.service
Graylog installation
Please download the package on the server for the installation of Graylog at the beginning:
wget https://packages.graylog2.org/repo/packages/graylog-5.0-repository_latest.deb
dpkg -i graylog-5.0-repository_latest.deb
apt update
apt install graylog-server
In order to access the web interface and connect servers, a password and an IP address must be assigned to the Graylog server. These instructions use http as an example. If these parameters are not set, it is not possible to start Graylog.
Please create a password_secret:
< /dev/urandom tr -dc A-Z-a-z-0-9 | head -c${1:-96};echo;
Please create also a root_password_sha2:
echo -n "Enter Password: " && head -1 </dev/stdin | tr -d '\n' | sha256sum | cut -d" " -f1
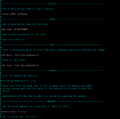
Both of these passwords or hash values must be copied from shell and pasted into the following file:
nano /etc/graylog/server/server.conf
-
![Add the copied hash values to the respective line with [STRG+U]. Comment root_username in addition and assign a username.](//www.thomas-krenn.com/de/wikiDE/images/thumb/2/2a/Graylog_Server_Passwort.png/120px-Graylog_Server_Passwort.png) Add the copied hash values to the respective line with [STRG+U]. Comment root_username in addition and assign a username.
Add the copied hash values to the respective line with [STRG+U]. Comment root_username in addition and assign a username. -
 Also enter the IP address configured on the system a little further down in the file and a port via which the Graylog web interface should be accessible.
After this, the Graylog server can be started and you can connect with the IP + port to the GUI.
systemctl daemon-reload
systemctl enable graylog-server.service
systemctl start graylog-server.service
Hint: To verify the state of all services, you can use systemctl status <Service> Please follow the instructions to create inputs:
-
 Please sign in with the configured login data in the webinterface.
 -
![In the tab, click on [System/Overview] and choose [Inputs].](//www.thomas-krenn.com/de/wikiDE/images/thumb/5/55/Graylog_Reiter.png/120px-Graylog_Reiter.png) In the tab, click on [System/Overview] and choose [Inputs].
In the tab, click on [System/Overview] and choose [Inputs]. -
![Create a new input by choosing Syslog UDP and click on [Launch new input].](//www.thomas-krenn.com/de/wikiDE/images/thumb/a/ab/Graylog_Input.png/120px-Graylog_Input.png) Create a new input by choosing Syslog UDP and click on [Launch new input].
Create a new input by choosing Syslog UDP and click on [Launch new input]. -
![Assign a title, configure a bind address and a port (under Proxmox VE 8006). Click on [Launch Input].](//www.thomas-krenn.com/de/wikiDE/images/thumb/c/c7/Graylog_Input2.png/53px-Graylog_Input2.png) Assign a title, configure a bind address and a port (under Proxmox VE 8006). Click on [Launch Input].
Assign a title, configure a bind address and a port (under Proxmox VE 8006). Click on [Launch Input].

![In the tab, click on [System/Overview] and choose [Inputs].](/en/wiki/File:Graylog_Reiter.png)
![Assign a title, configure a bind address and a port (under Proxmox VE 8006). Click on [Launch Input].](/en/wiki/File:Graylog_Input2.png)
Here, 0.0.0.0 was configured for the bind address. Therefore, logs are collected from all servers, which are available via port 8006.
Proxmox VE configuration
Now, you can start with the setup on the page of Proxmox VE. For this, the package rsyslog must be installed to send the logs to the graylog server:
apt update &&
apt install rsyslog -y
After the successful installation, the following file can be created with the help of nano and pasted into line 2. For this, the IP address and the port must be changed on the previously configured socket.
nano /etc/rsyslog.d/60-graylog.conf
*.*@10.2.1.137:8006;RSYSLOG_SyslogProtocol23Format
If the service has not been started automatically, this can still be started manually:
systemctl start rsyslog.service
After both systems are running, you can see your collected logs in the web interface and have successfully set up a Graylog server.
 |
Author: Niklas Pauli Niklas Pauli works in the product management team at Thomas-Krenn. He completed his general university entrance qualification at Freyung High School and then his training as an IT specialist for system integration at Thomas-Krenn.AG. After completing his training, he continued to work in the areas of Proxmox VE incl. Ceph, backup (Proxmox, Veeam, SEP). He is also a regular writer for the Thomas-Krenn-Wiki.
|
 |
Translator: Alina Ranzinger Alina has been working at Thomas-Krenn.AG since 2024. After her training as multilingual business assistant, she got her job as assistant of the Product Management and is responsible for the translation of texts and for the organisation of the department.
|