
ZFS dRAID Basics and Configuration
dRAID is a distributed Spare RAID implementation for ZFS. A dRAID vdev is composed of RAIDZ Array groups and is supported in Proxmox VE from version 7.3. The special feature of dRAID are its distributed hot spares.
This article provides an overview of the dRAID technology and instructions on how to set up a vdev based on dRAID on Proxmox 7.3.
Functionality
dRAID aims to distribute both parity and spare to all disks in the array. The characteristics of such an array will be explained herein.
Key Features
Simple representation of a slice. The groups are RAIDZ-1,2 or 3 arrays with static stripe length. thumb|Simple representation of a slice. The groups are RAIDZ-1,2 or 3 compounds with static stripe length. A dRAID consists of
- RAIDZ groups
- (distributed) spare(s)
These are arranged in so-called slices (see below). The RAIDZ groups are specified through the definition of the dRAID - a dRAID1 uses RAIDZ-1 groups, a dRAID3 uses RAIDZ-3 groups.
Therefore when defining a dRAID, the parameters data, parity and spare must always be specified. Optionally, the total number of mounted volumes (called children in dRAID) can also be specified.
Possible values are - analogous to RAIDZ levels - 1, 2 or 3 parities. The number of spares can be freely determined, the default value is 0. Data components are freely selectable up to a maximum. This maximum is determined by the total number of children minus the desired parities and spares within the array.
Here are some examples of possible definitions:
| Data devices (children) | definition | parity | data | spares |
|---|---|---|---|---|
| 4 | dRAID:2d:1s:4c | 1 | 2 | 1 |
| 11 | dRAID2:7d:2s:11c | 2 | 7 | 2 |
| 26 | dRAID3:8d:2s:26c | 3 | 8 | 2 |
| 50 | dRAID2:7d:3s:50c | 2 | 7 | 3 |
The stripe length of a dRAID is fixed - in contrast to a conventional RAIDZ. The stripe width is the product of disk sector size multiplied by the data portions, e.g. a disk sector size of 4k and a data portion of 7 (see example 2 above) would result in a stripe width of 7 * 4k = 28k.
Layout
A dRAID is an interaction of multiple parts[1]:
| child | Identifies a volume within a dRAID array. |
| row | A 16 MB chunk that has the same offset on all volumes. |
| group | Identifies the RAIDZ groups within the dRAID. They contain data and parity. If necessary, groups can be distributed across rows. |
| slice | A slice is the frame for groups and rows within a dRAID array. It is completed as soon as the groups of a row are completely written. |
| device map | The device map determines the distribution of data, parity and spare among the children in the array. It is divided into rows or columns. |
The device map is defined for each slice. Therefore it is useful to clarify the structure of a slice:
Each row within the device map represents a child in the dRAID. In each slice it is randomly permuted, i.e. rearranged. This ensures that data, parity and spares are randomly distributed among all children. This avoids hot-spots within the RAID set. The spare parts are static within a slice. They are distributed over the individual slices.
When including groups and rows, the whole picture of a dRAID comes together.
Let's consider the example of a dRAID2:4d:2s:11c. This definition means that the array is formed by 11 children. Each group contains 4 data and 2 parity, which corresponds to a RAIDZ-2. Additionally 2 spares are to be formed. Since 11 children are available, but only 9 children are used with data, parity and spares, groups must be distributed over several rows in this dRAID array. The best way to illustrate this is through a diagram:
As long as the sum of the data, parity and spares is lower than the number of children, a dRAID can always be formed.
The number of groups within a slice depends on when a row is complete and without remainder. The necessary groups within an array can be determined with the help of a short calculation.
Calculating groups per slice
The columns of a group are determined by the sum of data and parity. The difference between children and spares determines how many columns must be filled by groups. The least common multiple of these two values then shows how many groups are needed until a row can be filled completely and without remainder:
n := groups per slice, d :=data, p := parity, c := children, s := spare
n * d+p = KgV(d+p,c-s)
In unserem Beispiel ergibt das:
n * d+p = KgV(d+p,c-s)
n *  6  = KgV(6,9)
n *  6  = 18
n       =  3
So 3 groups are necessary.
Comparison with other RAID types
The following table compares dRAID with other RAID types. It should be noted that the diagrammatic representation of dRAID is highly simplified and the device map is not taken into account.
| designation | file system | volume minimum | stripe length (data + parity) | parity | Allocation (parity) | Allocation
(hot spare) |
Diagram |
|---|---|---|---|---|---|---|---|
| RAID-5 | - | 3 | Static | 1 | Distributed | Static (Single Device) | 400x400px |
| RAIDZ-1 [2,3] | OpenZFS | 3 | Dynamic | 1 [2,3] | Distributed | Static (Single Device) | 400x400px |
| dRAID-1 [2,3] | OpenZFS (as of 2.1.0) | 3 | Static | 1 [2,3] | Distributed | Distributed | 
|
Setup
This section covers the setup of a dRAID. It works for all distributions that provide at least OpenZFS 2.1.0.
It is reasonable to create a dRAID using SCSI IDs, which makes it easier to replace disks later. A configuration using SCSI-IDs is easier via GUI, but is also possible via terminal.
Terminal
The setup via the terminal is very simple and requires only one command.
The setup succeeds with[2]
# zpool create <options> <pool> draid[<parity>][:<data>d][:<children>c][:<spares>s] <vdevs...>
Explanation:
| Command | Description |
|---|---|
| zpool | package used to create a ZFS storage pool. |
| create | command to create a zpool. |
| <options> | Here you can set the regular options for a zpool. |
| <pool> | Field for the name of the zpool to create. |
| draid[<parity>] | command for defining the dRAID. Possible parities are 1 (default), 2 and 3. |
| [:<data>d] | number of data devices per group. A lower value increases IOPS, compression ratio and improves resilvering time. Also reduces the usable data capacity (default 8). |
| [:<children>c] | Total number of volumes to use. |
| [:<spares>s] | Number of spare devices (default 0). |
| <vdevs...> | Input of the vdevs to be used in the dRAID. |
Note: [:d][:c][:s] can be used in any order.
This is an example configuration:
-
 A total of 10 disks are available. Of these, /dev/sda to /dev/sdc are in use for Proxmox
 -
 Creating the dRAID
 -
 Checking the status of the zpool


GUI
A dRAID is a regular zpool and is set up as usual:
-
 Check Proxmox version (Proxmox 7.3 and higher).
 -
 Select node.
 -
 Select menu item Disks.
 -
 Submenu ZFS.
 -
 Create a new zpool under Create ZFS.
 -
 Select the desired dRAID level in the dropdown.
 -
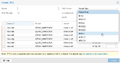
![Determine compression and ashift[3], select data devices and spares. Afterwards confirm.](//www.thomas-krenn.com/de/wikiDE/images/thumb/4/4d/GUIdRAID_create.png/120px-GUIdRAID_create.png) Determine compression and ashift[3], select data devices and spares. Afterwards confirm.
Determine compression and ashift[3], select data devices and spares. Afterwards confirm.

![Determine compression and ashift[3], select data devices and spares. Afterwards confirm.](/en/wiki/File:GUIdRAID_create.png)
Pool Comparison
In the following gallery you can see the difference between the (simple) setup via terminal setup via GUI:
-
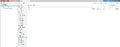
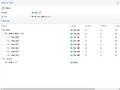 DRAID created in the terminal uses the device names by default.
 -
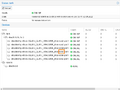
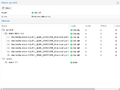 DRAID created in the GUI uses the SCSI ID by default.


Disk Failure
This section describes the resilvering and rebalancing of a dRAID in the event of a failure within the array.
Resilver
Due to the spare parts contained in the array, resilvering in dRAID works automatically as soon as the ZFS Event Daemon (ZED)[4] notices a failure. The following series of images illustrates the process within the Proxmox environment:
-
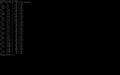
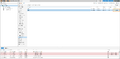
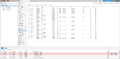 The disks with SCSI IDs 3-8 are connected in a dRAID1:4d:1s:6c.
 -
 The disk with SCSI ID 5 (sdf) has failed.
 -
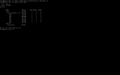
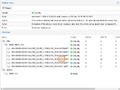
 In the GUI the RAID array is marked as DEGRADED.
 -
 Under details you can see that the array has already been resilvered.


Types of Resilvering
dRAID supports both sequential resilver[5] and traditional healing resilver.
The advantage of sequential resilver on dristibuted hot spares is that rebuild time scales with the quotient of disks and stripe length[6].
By default, sequential resilver is enabled. This can be retrieved with the command[7]
# zpool get feature@device_rebuild
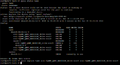
In our case, we get the following output:
# zpool get feature@device_rebuild
NAME   PROPERTY                VALUE                   SOURCE
rpool  feature@device_rebuild  enabled                 local
tank   feature@device_rebuild  enabled                 local
This value must be set when the array is created. A subsequent change is not possible:
# zpool set feature@device_rebuild=disabled tank
cannot set property for 'tank': property 'feature@device_rebuild' can only be set to 'disabled' at creation time
The correct command to create a dRAID without sequential resilver is:
# zpool create -o feature@device_rebuild=disabled <pool> ...
Example:
root@pve73-test:~# zpool create -o feature@device_rebuild=disabled tank draid:2d:2s:5c /dev/sd[d-h]
root@pve73-test:~# zpool get feature@device_rebuild
NAME   PROPERTY                VALUE                   SOURCE
rpool  feature@device_rebuild  enabled                 local
tank   feature@device_rebuild  disabled                local
root@pve73-test:~#
Rebalance
This process describes the rebalancing of a RAID array by replacing a failed disk. If a hard drive with the same SCSI ID is mounted in the system, a rebalance takes place automatically. If a disk with a different SCSI ID is to be mounted, this is not possible via GUI in the current Proxmox version 7.3-3, but exclusively via the terminal.
The command for mounting a new drive to the array:
# zpool replace <pool> <device-old> <device-new>
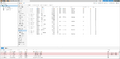
The following series of pictures illustrates the process:
-
 A hard drive with the same SCSI ID is mounted automatically.
 -
 A hard drive with a different SCSI ID is mounted.
 -
 Result of replacing the failed disk.


Further Information
- Aaron Toponce about RAID Levels and RAIDZ (pthree.org, 2012)
- Article on dRAID by Jim Salter (arstechnica.com, 2022)
References
 |
Author: Stefan Bohn Stefan Bohn has been employed at Thomas-Krenn.AG since 2020. Originally based in PreSales as a consultant for IT solutions, he moved to Product Management in 2022. There he dedicates himself to knowledge transfer and also drives the Thomas-Krenn Wiki.
|