
Windows installation on a RAID-compound
In this article, you will find information on what to note when installing Windows desktop versions and Windows Server on a RAID to guarantee a smooth installation.
Hardware and software
The following hardware and software is used as test environment:
- Operating system: Windows Server 2022 Standard (desktop version)
- Mainboard: Supermicro X12DPi-NT6
- CPU: Dual Intel Xeon Silver 4316
- RAM: 2x 64 GB ECC Registered (RDIMM) DDR4 2666 RAM 4 Rank
- RAID Controller
Installation preparation
In the following, the preparations for the installation of a Windows operating system on a RAID compound are described.
RAID creation and initialization
First, a properly configured RAID is important. When creating the RAID, it should also be initialized.
Initializing a RAID overwrites several sectors of the virtual hard disk with zeros. If no initialization is performed, among other things, background tasks such as the consistency check, which checks the parities in RAID 5, 6, 50, and 60, cannot be performed later. For RAID 0, 1 and 10, a Fast Initialization is enough, where only the first and last sectors are overwritten. For RAID 5, 6, 50 and 60 is, however, a Full Initialization recommended, which overwrites all sectors with zeros and can therefore take several hours to days on larger hard drives (see also:MegaRAID glossary).
In the following screenshots, the process for deleting, creating and initializing of a RAID for Broadcom, Adaptec and Intel VROC in UEFI-controller-BIOS is explained. If the RAID controller is not displayed in the BIOS, it is operated via Legacy. Before you create a new RAID, you can delete the hard drive. This also deletes the existing RAID metadata on the hard disks and ensures smooth RAID creation.
Broadcom MegaRAID
In the following, the process for deleting, creating and initializing a Broadcom RAID under UEFI is explained.
-
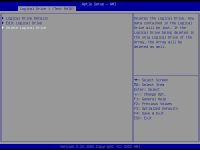
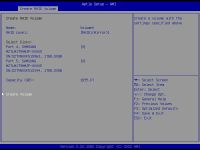
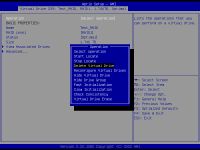 Deleting a Broadcom RAID: In the mainboard BIOS under Advanced, you will find the controller BIOS. In this window, you must select the appropriate RAID under Virtual Drive Management in the Main Menu. The RAID can then be deleted under Operation in Delete Virtual Drive.
 -
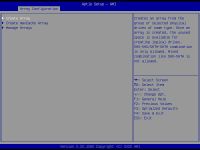
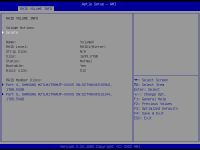
 Creating a Broadcom RAID: In the Configuration Management, which is also reachable under Main Menu, a new RAID can be created under Create Virtual Drive. After this, you have to select the hard drives, determine a RAID level and assign a name. With Broadcom controllers, you also have the option of performing a fast (almost) or complete (full) initialization under Default Initialization.


Adaptec
In the following gallery, it is explained how an Adaptec RAID is deleted and recreated under UEFI.
-
 Deleting an Adaptec RAIDS: First, open the controller BIOS in the mainboard BIOS under Advanced. Then delete the RAID by following these steps: Array Configuration --> Manage Arrays --> Array X --> List Logical Drives --> Logical Drive X --> Delete Logical Drive
 -
 Creating an Adaptec RAID: Array Configuration --> Create RAID --> Select hard drives --> RAID Level --> assign names and create RAID


VROC
In this gallery, the same process of deleting and recreating a VROC-RAID is explained.
-
 Delete VROC RAID: To delete your RAID, you have to select the VROC-Controller under Advanced in the BIOS. After this, the RAID can be selected and deleted via Delete.
 -
 Creating a VROC RAID: You can create a VROC-RAID via Create RAID in the Controller BIOS. After this, the hard disk must be selected, a name and the RAID-level must be assigned.


Boot mode
Before the installation of the operating system can be started, the correct booting mode for the installation medium must be determined. There are two booting modes: UEFI and Legacy. The installation medium must be started in the same booting mode as for the RAID, as there may be complications with the installations.
The following table describes how to determine the mode of the controller:
| UEFI | Legacy |
|---|---|
| If the controller is operated with UEFI firmware, the controller BIOS can be found in the motherboard BIOS under Advanced.
This is the case for both hardware RAIDs and onboard RAIDs (VROC). If the RAID has been configured here, it is a UEFI RAID. |
If the controller is addressed via legacy, the controller BIOS is not displayed in the mainboard BIOS.
The controller BIOS is now displayed when the server boots up and can be opened with a key combination. If the RAID was configured here, it is a legacy RAID. |
The following table shows the Legacy BIOS key combination:
| Broadcom | Adaptec | VROC/RST | |
|---|---|---|---|
| Shortcut | CTRL + R | CTRL +A | CTRL + I |
Change of Legacy/UEFI
The BIOS options specify whether each PCI slot on the motherboard is operated in legacy or UEFI mode. The mode can also be changed there.
In the case of Supermicro motherboards, this can be changed under the Advanced tab in the PCIe/PCI/PnP Configuration menu. All PCI slots are listed here in the format CPU SLOTX PCI-E ... and can be set individually to Legacy or EFI.
Installationmedium Legace/UEFI
If you have determined, in which mode the RAID has been created, the installation medium must be started in the same mode. If you get a notification after starting the installation medium, that it was started in the wrong mode, you have to recreate the medium with the right partition scheme (MBR for Legacy or GPT for UEFI): Create installation medium with Rufus.
In the BIOS under Save & Exit, all possible boot media are displayed under Boot Override.

You can tell by the intention if the installation medium now starts via UEFI or Legacy.
UEFI: USB, Partition 2 (USB) - medium is started via UEFI.
No intention: medium is started via Legacy.
If no UEFI or Legacy boot media is displayed, the Boot Mode can be changed to Legacy, UEFI or Dual in the BIOS under Boot.
Use different ISO and medium
Please make sure that an intact Windows ISO is used on an intact medium to guarantee a proper installation. It may come to installation cancellation or that the installation routine does not start when using corrupt Windows ISO-files.
If the installation does not start or if there are cancellations, the ISO should be downloaded or another ISO-file should be started. If problems still occur, the medium must be verified or changed.
Create installation medium with Rufus
Another source of errors during installation is the application used to create the installation medium. We recommend Rufus[1], as it is a small program and easy to understand. Currently, Rufus can only be used to create installation media for Windows, but according to the manufacturer, support for other operating systems is planned for the future.
You can download Rufus here: [1]
If you have started Rufus, select your USB stick under drive. After this, you can add the desired ISO under choice. Now, you have to select the partition scheme. For a Legacy installation, you need MBR.
In this Wiki article, it is explained, how to create an UEFI boot stick for Windows.
Include driver during installation
The respective drivers are needed for the installation of Windows for the used RAID controllers. If the created RAID is not displayed as a free drive in Windows Installer or if an error message is generated when attempting to install on it, these drivers may still be missing.
In this case, the respective drivers must be downloaded and included for the RAID controller. You will find the driver on our download page or you can download it on the page of the manufacturer. After downloading, the archive, in which the driver is located, must be unpacked, copied to a USB stick and plugged into the server.
The following screenshots explain how to include the driver.
-
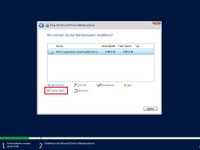 First, open the window for selecting the driver via Load Driver.
 -
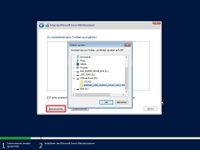 In this window, you can open Explorer via Explorer. In Explorer, select the subfolder containing the driver on the USB stick and confirm.
 -
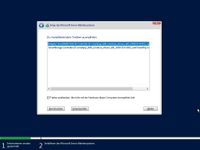 Finally, the subfolder is searched for suitable drivers. When the driver is displayed, simply select it and confirm.


The RAID can then be selected as the installation location and the installation can be started then.
References
 |
Translator: Alina Ranzinger Alina has been working at Thomas-Krenn.AG since 2024. After her training as multilingual business assistant, she got her job as assistant of the Product Management and is responsible for the translation of texts and for the organisation of the department.
|