

 wiki
wikiSamba Sharing with Authentication
As a supplement to a basic Samba share, this article shows you how to set up a username- and password-based Samba share using a Debian 8-based system. Ubuntu 16.04 as well as Windows 10 is used as client software to test the connection. Information on the fundamental and unrestricted release can be found in the article Simple Samba Shares in Debian.
Installation and configuration on Debian server
The following paragraphs show the required configuration steps on a Debian server to set up the Samba server. The shared folder can then be mounted using a Linux-based or Windows-based client.
Installation of the Samba service
The Installation of Samba service and the basic configuration is done in the same way as for the article Simple Samba Shares in Debian.
User-restricted configuration
This configuration example shows how to do a SMB-Share with authentication. To do this, a user named "smbuser" is created on the Debian system, and a restricted share entry is added to the smb.conf configuration file.
- Create SMB-user
$ sudo useradd -s /bin/false smbuser
- Set password
$ sudo smbpasswd -a smbuser
- Entry in the smb.conf file:
[global]
workgroup = smb
security = user
map to guest = never

[homes]
comment = Home Directories
browsable = no
read only = no
create mode = 0750

[restricted]
valid users = smbuser
#We restrict the acces on the ''smbuser'' user
#valid users = @smbusers
#Alternatively, it can also be restricted to one user group.
path = /media/storage2/
public = no
writable = yes
comment = smb restricted share
printable = no
guest ok = no
create mask = 0600
directory mask = 0700
This configuration uses the example mountpoint /media/storage2. To restrict access to the shared folder as much as possible, this /media/storage2 mountpoint is assigned to the smbuser user and equipped with the directory rights 700 so that this user (and root) receives reading and writing rights.
$sudo chown -R smbuser:smbuser /media/storage2
$sudo chmod 700 /media/storage2
Restart Samba
To apply the configuration, you have to restart the Samba service. This is made on Debian 8 with systemd.
$ sudo systemctl restart smbd.service
Mounting of release
After the Samba server has been configured and restarted completely, the created share can now be used by clients. This is explained in the following sections using an Ubuntu 16.04 and a Windows 10 client.
On a Linux-based client
The cifs-utils package is used in all current Linux-based distributions. Up to and including Ubuntu 12.04, the old smbfs package could be used.[1]
$ apt-get install cifs-utils
The Samba user smbuser, as configured on the Debian system, is used, and you will be prompted for the password.
$ sudo mount -t cifs //<IP-des-Samba-Servers>/restricted /media/tniedermeier/test -o user=smbuser
Password for smbuser@//<IP-des-Samba-Servers>/restricted:  ********
Further information on mounted releases can be received using the "mount" command in the terminal.
On a Windows 10 client
The share can be connected to a Windows 10 client as explained in the following section. There are multiple opportunities to establish a connection.
You can connect to the network drive using the following command in the command prompt:[2]
C:\Users\tniedermeier>net use <Laufwerksbuchstabe>: \\<IP-des-Samba-Servers>\restricted /user:smbuser <Passwort>
Alternatively, you can also connect the network drive using file explorer, as explained in the following steps:
-
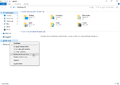 Step 1: Click right on "Network" in the left-hand menu of the file explorer, then click left on the context menu option "Map network drive".
 -
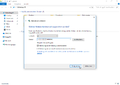 Step 2: Select an available drive letter and type the path to the shared folder in the "Folder" field, for example \\<IP-des-Samba-Servers>\restricted. After this, click on Finish.
 -
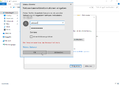 The network drive has been started successfully. Its content is now displayed in the explorer.
 -
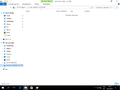 The new connected network drive restricted is now displayed in the left hand menu of the explorer.


If you want to access the release without assigning a drive letter to it, you can also simply type the network path directly into the address bar in the explorer:
\\<IP-des-Samba-Servers>\restricted
References
- ↑ Samba Client cifs (wiki.ubuntuusers.de)
- ↑ Net use (technet.microsoft.com)
 |
Author: Thomas Niedermeier Thomas Niedermeier working in the product management team at Thomas-Krenn, completed his bachelor's degree in business informatics at the Deggendorf University of Applied Sciences. Since 2013 Thomas is employed at Thomas-Krenn and takes care of OPNsense firewalls, the Thomas-Krenn-Wiki and firmware security updates.
|
 |
Translator: Alina Ranzinger Alina has been working at Thomas-Krenn.AG since 2024. After her training as multilingual business assistant, she got her job as assistant of the Product Management and is responsible for the translation of texts and for the organisation of the department.
|