OPNsense HA Cluster configuration
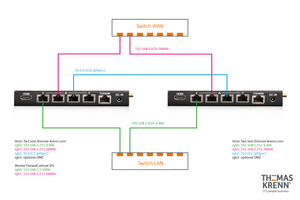
The free open source firewall OPNsense] can be configured as a redundant firewall with automatic fail-over. This article shows how to set up such a firewall HA cluster with two firewall machines (in this case two LES compact 4L).
Requirements
A redundant OPNsense firewall requires:
- Two firewall machines, each with at least three network ports.
- WAN: Uplink with at least three available IP addresses (one fixed IP address each for Firewall 1 and Firewall 2, as well as an additional virtual IP address for the Firewall Master).
- LAN: three free IP addresses in the LAN (one fixed IP address each for Firewall 1 and Firewall 2, as well as an additional virtual IP address for the Firewall Master).
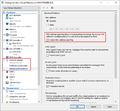
If the two OPNsense cluster nodes are running in virtual machines, the virtual machines must be allowed to change MAC addresses. This is required for the use of the Common Address Redundancy Protocol (CARP). The corresponding settings are:
Basics
The following technologies are used in a redundant OPNsense firewall:
- Common Address Redundancy Protocol (CARP)':[4] Protocol for providing highly available IP addresses
- Uses the IP protocol 112 (like VRRP).
- Uses multicast packets to communicate current status information to other participating computers in the cluster.
- pfsync:[5] Protocol for replicating the status information of the individual network connections (state table synchronization).
- Note: In order for the state information to be correctly applied on both firewalls, both firewalls must use the same interface names for the same networks. For example, if the internal network (LAN) on Firewall 1 is connected via the igb0 interface, igb0 must also be assigned to the LAN on Firewall 2. If there are two different firewalls with different network cards (and thus interface names), LAGG can be configured as workaround.
- For pfSync it is recommended to use a dedicated interface on both firewalls. This increases security (state injection) and performance.
- XMLRPC sync: Synchronization of the firewall configuration.
Configuration
Recommendation: When setting up a new firewall, configure the cluster network first. After setting up the HA cluster, start by configuring additional firewall configurations (firewall rules, services, ...). This procedure reduces possible error sources.
To set up a redundant OPNsense firewall, follow these steps:[6]
- Installation of OPNsense on both firewall computers.
- Configuration of the static IP addresses on Firewall 1 and Firewall 2. If only IPv4 is used, we recommend to deactivate IPv6 on both firewalls. In this example we use the following IP addresses:
- igb0 (LAN): 192.168.1.251/24 (Firewall 1); 192.168.1.252/24 (Firewall 2)
- igb1 (WAN): 10.1.102.251/24 (Firewall 1); 10.1.102.252/24 (Firewall 2)
- igb2 (pfSync): 10.0.0.1/24 (Firewall 1); 10.0.0.2/24 (Firewall 2). Details on the configuration of this additional network interface are documented in the article OPNsense add interface.
- Deactivate the DHCP server on both firewalls (under Services ‣ DHCPv4 ‣ [LAN]).
- Create firewall rules on both firewalls. Under Firewall ‣ Rules the following rules are required for the three interfaces:
- LAN: Allow CARP packets (select Protocol: CARP)
- WAN: Allow CARP packets (select Protocol: CARP)
- PFSYNC: since it is a direct cable connection, allow any network traffic.
- Set up virtual IPs:
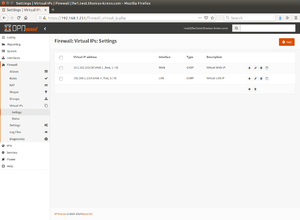
- On Firewall 1 (Master) under Interfaces ‣ Virtual IPs ‣ Settings create a new virtual WAN IP with the following parameters by clicking on + Add:
- Mode: CARP
- Interface: WAN
- Address: 10.1.102.253/24
- Virtual password: Use a random password of 30 characters. You can create this password on a Linux or FreeBSD machine using the following command on the command line:[7]
cat /dev/random | hexdump -n 30| cut -d \ -f 2-| head -n 1 | tr -d " "
- VHID Group: 1
- Advertising Frequency: Base 1 / Skew 0
- Description: Virtual WAN IP
- Create a new virtual LAN IP with the following parameters on Firewall 1 (Master) by clicking on + Add:
- Mode: CARP
- Interface: LAN
- Address: 192.168.1.1/24
- Virtual password: Use a random password of 30 characters.
- VHID Group: 3 (this number is used as last octet of the MAC address for the virtual IP address, in this example the MAC address is then 00:00:5e:00:01:03)[8]
- Advertising Frequency: Base 1 / Skew 0
- Description: Virtual LAN IP
- On Firewall 1 (Master) under Interfaces ‣ Virtual IPs ‣ Settings create a new virtual WAN IP with the following parameters by clicking on + Add:
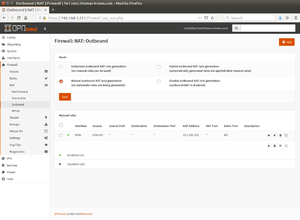
- Configure outgoing NAT. Under Firewall ‣ NAT ‣ Outbound, select the option Manual outbound NAT rule generation and create a new rule by clicking + Add:
- Interface: WAN
- Source address: LAN net
- Translation / target: 10.1.102.253 (Virtual WAN IP)
- Optionally configure DHCP server. On both firewalls under Services ‣ DHCPv4 ‣ [LAN], select the following parameters:
- DNS servers: 192.168.1.1 (corresponds to the Virtual LAN IP)
- Gateway: 192.168.1.1 (corresponds to the Virtual LAN IP)
- Failover peer IP: 192.168.1.252 (IP of the other firewall), on firewall 2 set 192.168.1.251 (IP of the first firewall)
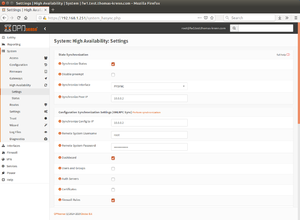
- Configure pfSync and HA synchronization (xmlrpc) on Firewall 1. Under System ‣ High Availability ‣ Settings, select the following settings:
- Synchronize States: ✔
- Synchronize Interface: PFSYNC
- Synchronize Peer IP: 10.0.0.2 (here use the IP address of the PFSYNC interface of Firewall 2)
- Synchronize Config to IP: 10.0.0.2
- Remote System Username: root
- Remote System Password: (passwort of Firewall 2)
- Select services to be synchronized. In this example:
- Dashboard: ✔
- Firewall Rules: ✔
- Aliases: ✔
- NAT: ✔
- DHCPD: ✔
- Virtual IPs: ✔
- Configure pfSync on Firewall 2. Under System ‣ High Availability ‣ Settings, select the following settings:
- Synchronize States: ✔
- Disable preempt: leave this option disabled (preemt remains active in this way). This ensures that if a single network connection (e.g. WAN connection from Firewall 1) fails, all IP addresses (WAN and LAN in this example) are moved to the second firewall.[9]
- Synchronize Interface: PFSYNC
- Synchronize Peer IP: 10.0.0.1 (here use the IP address of the PFSYNC interface of Firewall 1)
- Note: Do not configure HA synchronization (xmlrpc) on Firewall 2. The later configuration (e.g. of firewall rules, etc.) is performed exclusively on firewall 1 and thus synchronized to firewall 2.
- On Firewall 1 in the Dashboard, add the CARP widget by clicking on + Widget, selecting CARP and then clicking on Safe Settings.
- Finally reboot both systems.
Note: If additional services (e.g. OpenVPN) are configured, the synchronization of the configuration must first be activated under System ‣ High Availability ‣ Settings. When configuring the service, the Virtual WAN IP must be selected as the interface for the service.
Failure Test
A Linux client connected in the test LAN shows the virtual MAC address 00:00:5e:00:01:03 for the default gateway 192.168.1.1 when querying the ARP cache via "ip n":
wfischer@ubuntu:~$ ip n
192.168.1.1 dev eth0 lladdr 00:00:5e:00:01:03 REACHABLE
Now, for testing on Firewall 1 (previous master), the network cable is disconnected from the WAN port (igb1). Connections from the Linux client to the Internet (e.g. an SSH connection or a virtual desktop connection) are retained.
The following output shows the log entries in /var/log/system.log as well as the sysctl values from net.inet.carp to Firewall 1. The interface igb1 changes to the status "interface down", then the "Demotion Counter" is set to 240:
root@fw1:~ # clog -f /var/log/system.log
Aug 26 11:39:17 fw1 kernel: carp: 1@igb1: MASTER -> INIT (hardware interface down)
Aug 26 11:39:17 fw1 kernel: carp: demoted by 240 to 240 (interface down)
Aug 26 11:39:17 fw1 kernel: igb1: link state changed to DOWN
Aug 26 11:39:17 fw1 kernel: carp: 3@igb0: MASTER -> BACKUP (more frequent advertisement received)
Aug 26 11:39:17 fw1 kernel: ifa_maintain_loopback_route: deletion failed for interface igb0: 3
Aug 26 11:39:18 fw1 opnsense: /usr/local/etc/rc.linkup: DEVD Ethernet detached event for wan
Aug 26 11:39:18 fw1 opnsense: /usr/local/etc/rc.syshook.d/carp/20-openvpn:
                    Carp cluster member "192.168.1.1 - Virtual LAN IP (3@igb0)" has resumed the state "BACKUP" for vhid 3
[Ctrl]+[c]
root@fw1:~ # sysctl net.inet.carp
net.inet.carp.ifdown_demotion_factor: 240
net.inet.carp.senderr_demotion_factor: 240
net.inet.carp.demotion: 240
net.inet.carp.log: 1
net.inet.carp.preempt: 1
net.inet.carp.allow: 1
The following output shows the log entries in /var/log/system.log and the sysctl values of net.inet.carp on firewall 2:
root@fw2:~ # clog -f /var/log/system.log
Aug 26 11:39:17 fw2 kernel: carp: 3@igb0: BACKUP -> MASTER (preempting a slower master)
Aug 26 11:39:18 fw2 opnsense: /usr/local/etc/rc.syshook.d/carp/20-openvpn:
                    Carp cluster member "192.168.1.1 - Virtual LAN IP (3@igb0)" has resumed the state "MASTER" for vhid 3
Aug 26 11:39:19 fw2 kernel: carp: 1@igb1: BACKUP -> MASTER (master timed out)
Aug 26 11:39:20 fw2 opnsense: /usr/local/etc/rc.syshook.d/carp/20-openvpn:
                    Carp cluster member "10.1.102.253 - Virtual WAN IP (1@igb1)" has resumed the state "MASTER" for vhid 1
[Ctrl]+[c]
root@fw2:~ # sysctl net.inet.carp
net.inet.carp.ifdown_demotion_factor: 240
net.inet.carp.senderr_demotion_factor: 240
net.inet.carp.demotion: 0
net.inet.carp.log: 1
net.inet.carp.preempt: 1
net.inet.carp.allow: 1
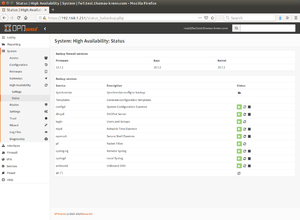
The following information can be seen in the web interface of Firewall 1 (Firewall 2 is now MASTER for LAN and WAN):
Firewall Update
With a redundant active/passive firewall HA cluster, the downtime of the firewall in a firewall update can be drastically minimized:
- Update the backup firewall (Firewall 2) and wait until it is online again.
- On the primary firewall, under Firewall ‣ Virtual IPs ‣ Status, select Enter Persistent CARP Maintenance Mode.
- Once Firewall 2 has become the MASTER, check that all services such as DHCP, VPN, NAT are working correctly after the update. In the unlikely event that the firewall update caused problems with certain services, you can switch back to the original firewall before installing the update.
- If all services work as desired after the update, update Firewall 1 and then select Leave Persistent CARP Maintenance Mode.
- Note for OPNsense 19.7.3: If an automatic restart of Firewall 1 has taken place during the update, after clicking on Leave Persistent CARP Maintenance Mode a reboot of Firewall 1 must be carried out so that the values of advskew on Firewall 1 are set to 0 again.[10] This bug was fixed with OPNsense version 19.7.4.[11][12]
FAQs and Error Analysis
- Question: If a single network connection from Firewall 1 (e.g. the WAN connection) fails, only the WAN IP is moved to Firewall 2, but not the LAN IP. How can I fix this problem?
- Check if the option Disable preempt is deactivated on both firewalls under System ‣ High Availability ‣ Settings.
- Check the values for advbase and advskew on the command line on both firewalls using ifconfig | grep carp'.
- advbase: should have the value "1" on all CARP interfaces on Firewall 1 and Firewall 2
- advskew: should have the value "0" on all CARP interfaces on Firewall 1 and the value "100" on all CARP interfaces on Firewall 2.
References
- ↑ Troubleshooting High Availability Clusters in Virtual Environments (docs.netgate.com)
- ↑ Duplicate response for Internet Control Message Protocol (ICMP) request - CARP controller nodes running on a same ESXi host (2144849) (kb.vmware.com)
- ↑ Virtual & Cloud based Installation - VMware ESXi
- ↑ Common Address Redundancy Protocol (en.wikipedia.org)
- ↑ pfsync Manpage (www.freebsd.org)
- ↑ Configure CARP (docs.opnsense.org)
- ↑ CARP on FreeBSD 10 with Pf Firewall (calomel.org) We suggest a password of 30 characters which is the maximum length allowed. To assist in making random passwords for carp aliases we suggest the following line. It queries /dev/random and outputs a clean 30 character string which you can cut and paste in place for "pass".
- ↑ RFC5798 Virtual Router Redundancy Protocol (VRRP) Version 3 for IPv4 and IPv6 - Virtual Router MAC Address (tools.ietf.org)
- ↑ OpenBSD PF - Firewall Redundancy (CARP and pfsync) (www.openbsd.org) net.inet.carp.preempt: Allow hosts within a redundancy group that have a better advbase and advskew to preempt the master. In addition, this option also enables failing over a group of interfaces together in the event that one interface goes down. If one physical CARP-enabled interface goes down, CARP will increase the demotion counter, carpdemote, by 1 on interface groups that the carp(4) interface is a member of, in effect causing all group members to fail-over together.
- ↑ Enter Persistent CARP Maintenance Mode - advskew 254 causes problems (forum.opnsense.org, 26.08.2019)
- ↑ CARP: leaving maintenance mode on unit1 after reboot doesn't change advskew #3671 (github.com/opnsense/core/issues)
- ↑ OPNsense 19.7.4 released (forum.opnsense.org) system: fix CARP maintenance mode bootup
Further Information
- Common Address Redundancy Protocol (CARP) (www.freebsd.org/doc/handbook)
|
Author: Werner Fischer Werner Fischer, working in the Knowledge Transfer team at Thomas-Krenn, completed his studies of Computer and Media Security at FH Hagenberg in Austria. He is a regular speaker at many conferences like LinuxTag, OSMC, OSDC, LinuxCon, and author for various IT magazines. In his spare time he enjoys playing the piano and training for a good result at the annual Linz marathon relay.
|
![VMware ESXi: Activate Allow forged transmits and Allow MAC changes. If necessary, Promiscous Mode must also be activated.[1][2] Additionally, the os-vmware plugin can be installed.[3]](http://www.thomas-krenn.com/de/wikiDE/images/thumb/3/37/VMware_mac_address_changes.png/120px-VMware_mac_address_changes.png)
